Turn off Notifications in Windows 11 (2021)
In this article, we have added separate sections covering various scenarios where you get notifications and how you can disable them. Without wasting any time, let’s get started with the steps involved to disable notifications in Windows 11. Note: This article focuses on disabling notifications in Windows 11. If you haven’t upgraded from Windows 10 to Windows 11 or have already rolled back to Windows 10, check out our detailed guide on disabling notifications in Windows 10.
Disable Suggested Notifications
Nothing annoys me more than a machine telling me what to do. If you are reading this, the feeling is likely mutual. With Windows 11, Microsoft sends suggested notifications to promote Windows 11 features. While this might be useful for beginners, power users tend to find this redundant and forced. If you don’t want to get distracted with suggested notifications, here’s how to turn them off for good in Windows 11:
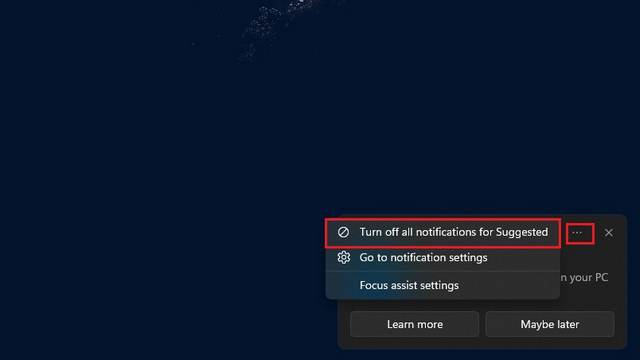
If you get a suggested notification banner in Windows 11, you can remove it with ease. Click on the horizontal three-dots menu and choose the “Turn off all notifications for Suggested” option.
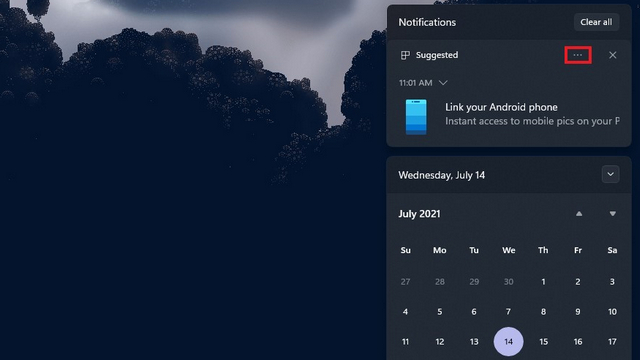
Similarly, you can access the notification panel by clicking on the date and time option or using the new Windows 11 keyboard shortcut Win key + N. Then, spot the suggested notification, and click on the “Turn off all notifications for Suggested” option under the horizontal three-dots menu.
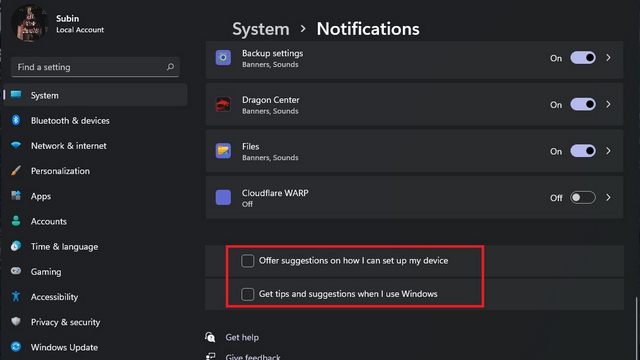
As an added measure, visit System -> Notifications and scroll down until you find the checkboxes titled “Offer suggestions on how I can set up my device” and “Get tips and suggestions when I use Windows”. Then, turn off these options. This way, you can rest assured that Windows 11 won’t bother you with suggestions.
Disable Notifications for an App from Notification Center
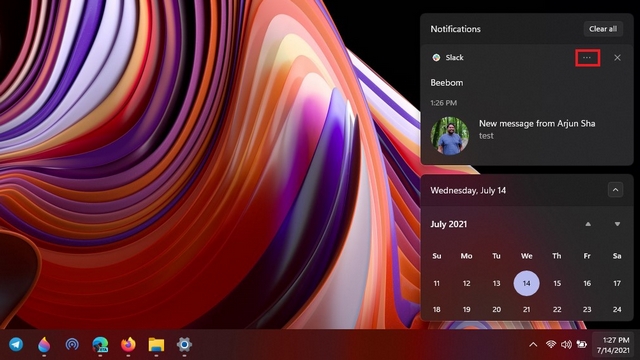
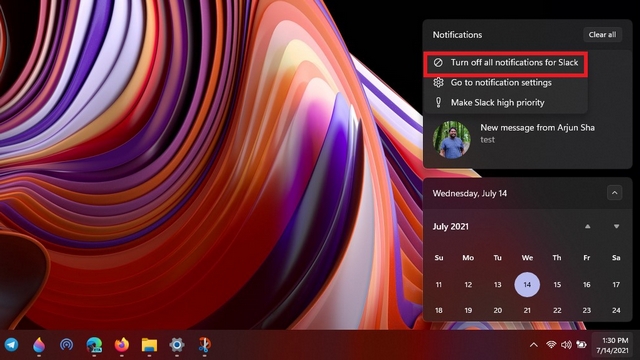
The Action Center is no longer the home for notifications on Windows 11 and is now accessible from the date and time system tray icon instead. So, open the Notification Center and click on the horizontal three-dots menu on a notification to get the option to disable notifications in Windows 11.
From the list of options, choose “Turn off all notifications for
” and you will no longer get notifications from that particular app. To turn off all notifications, check the next section.
Turn Off All Notifications in Windows 11
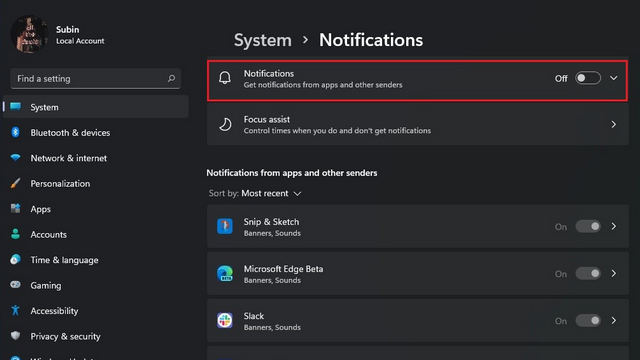
If you want to avoid all distractions, you can choose to disable notifications entirely in Windows 11. To do that, open the Settings app, navigate to System -> Notifications, and disable the “Notifications” toggle.
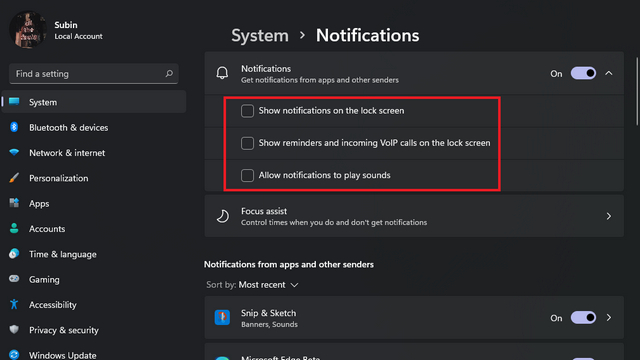
If you are someone who wishes to get some notifications without too much intrusion, enable or disable lock screen notifications, the sound for notifications, and other options. You will find these options by expanding the Notifications drop-down in the Settings.
Disable Lock Screen Notifications
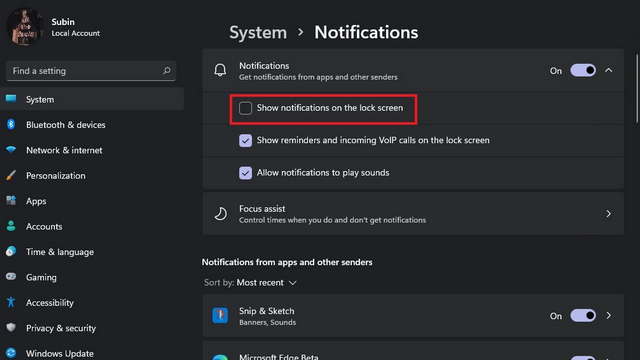
For those who prefer a clean look on the lock screen, visit System -> Notifications and disable the “Show notifications on the lock screen” toggle. Since Microsoft has removed the Quick Status icons in the lock screen, that’s one feature you won’t have to disable in Windows 11.
Turn Off Notifications for Individual Apps from Settings
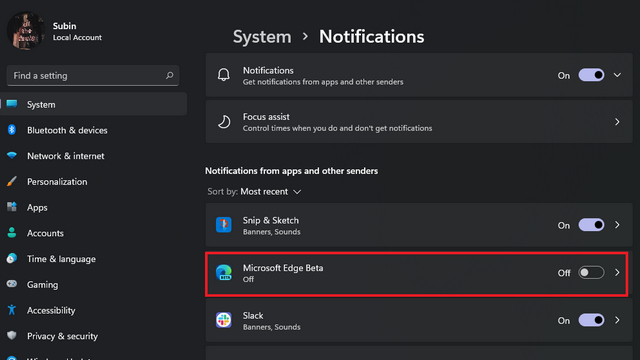
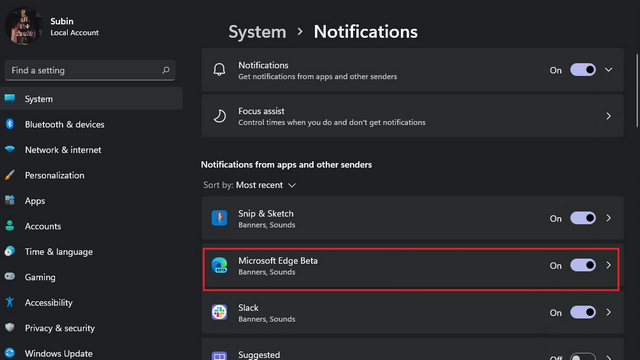
Microsoft also makes it easy to disable notifications for individual apps in Windows 11. Visit System -> Notifications in the Settings app and find the app you would like to disable notifications for under the “Notifications from apps and other senders” section. To make it easier to spot the app, you can sort them by name or most recently used apps. Once you have located the app, disable the notification toggle next to the app listing. You won’t receive notifications from that app going forward. You can repeat these steps for other apps too.
Disable Notification Banners in Windows 11
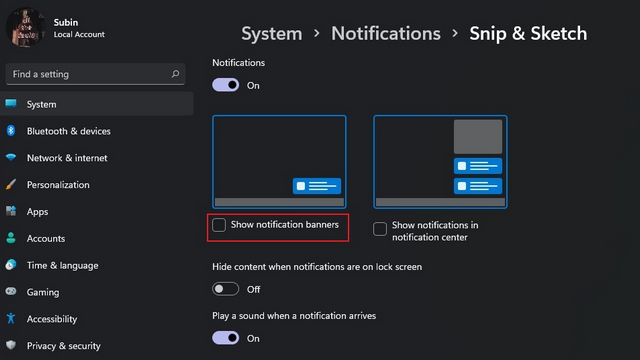
While there isn’t a universal toggle for disabling notification banners in Windows 11, you can individually disable the feature for specific apps. Visit System -> Notifications and click on the target app from the “Notifications from apps and other senders” section.
You will now see a checkbox that reads “Show notification banners“. Uncheck it, and you are all set. You can also choose to disable notifications in the notification center for individual apps from this screen.
Set Notification Priority in Windows 11
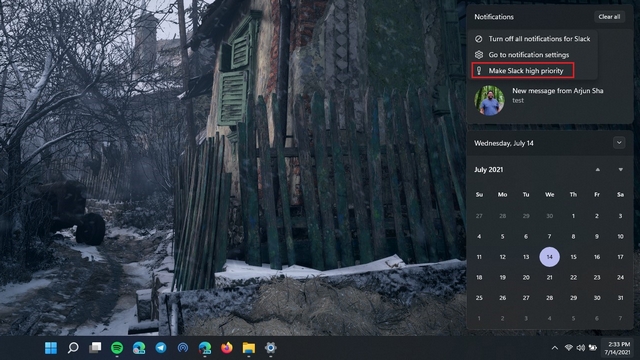
If you don’t want to miss work-related notifications or other important notifications from any of your favorite apps, you can set them as a priority. Click on the three-dots menu of a notification from the notification center and choose the “Make
high priority” option. You also have the option to tweak the priority of app notifications from the Settings app. To do that, pick an app from the “Notifications from apps and other senders” section under System -> Notifications in the Settings app.
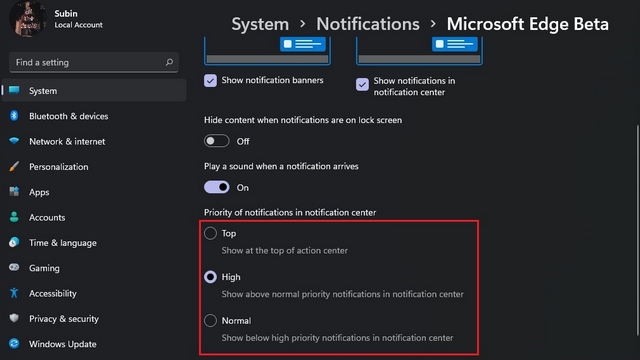
After opening the app’s notifications page, set the priority of notifications. You can set an app’s notifications to have Top, High, or Normal priority. Needless to say, you should set the priority of important apps as High to make sure you don’t miss out on any updates.
Mute Notifications with Focus Assist
Also available in Windows 10, the Focus Assist feature gives you the flexibility to choose when you want to avoid distracting notifications. It automatically activates when you are playing games or using a second monitor or projector to duplicate your display. But if you wish to enable it manually, follow the steps below to turn off notifications in Windows 11.
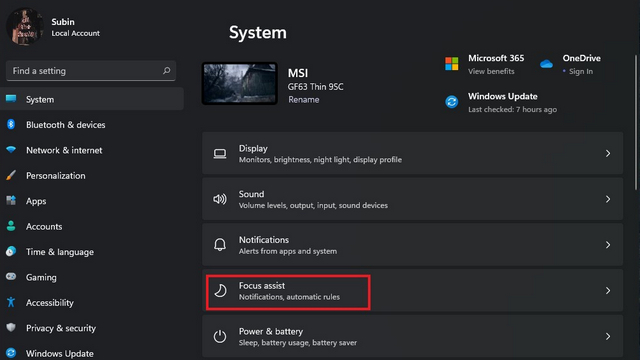
Open the Settings app on your Windows 11 Pc and click on “Focus assist” under the System section.
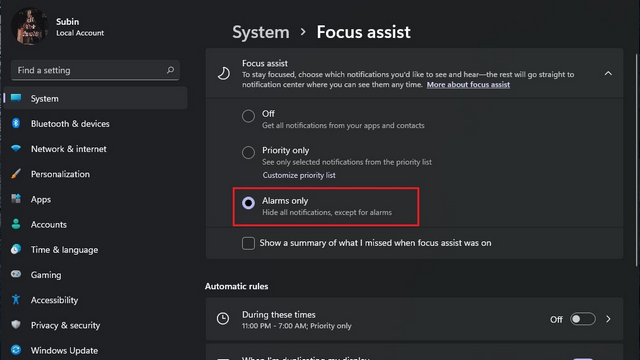
You can choose to see only alarms or notifications from a list of priority apps when you enable Focus Assist. Choose the appropriate option based on your preference.
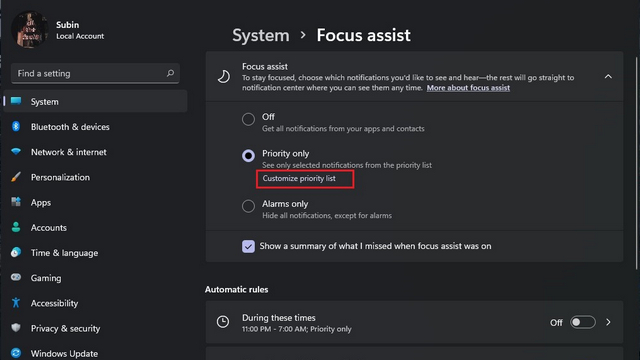
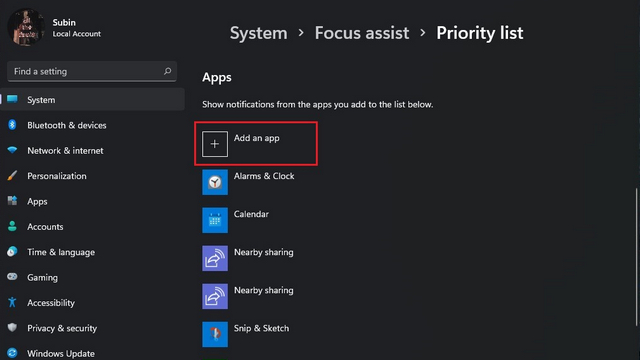
If you choose to get notifications from a list of priority apps, click on “Customize priority list” to specify them.
Up next, click on “Add an app” to include an app to your priority list.
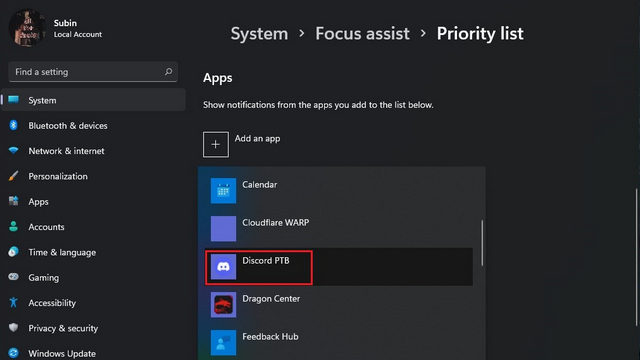
Pick the app from the list of apps that appear, and you are all set. You will only get notifications from these apps when you enable Focus Assist.
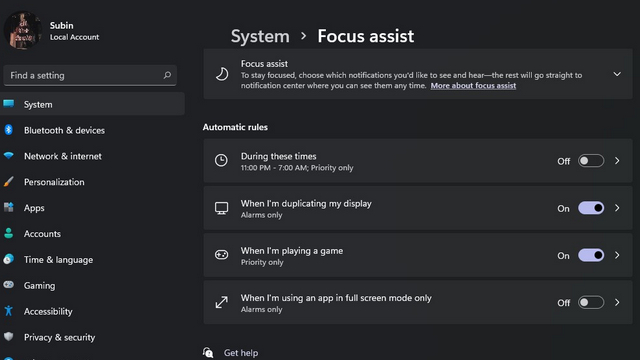
You can also trigger Focus Assist mode with automatic rules, say during work hours or while playing a game. Enable the toggles as per your use-case to activate focus mode.
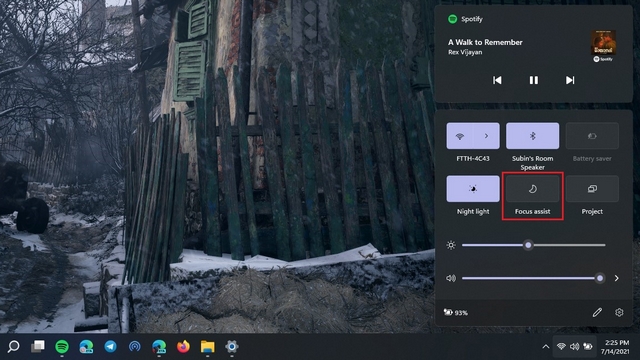
Finally, if you prefer manually toggling focus mode instead, open the Action Center and click on the Focus Assist toggle to activate or deactivate Focus Assist. If you want to take your productivity to the next level, use third-party apps like Freedom or LeechBlock, as we have detailed in our article on the best apps for focusing on work.
Clear All Notifications in Windows 11
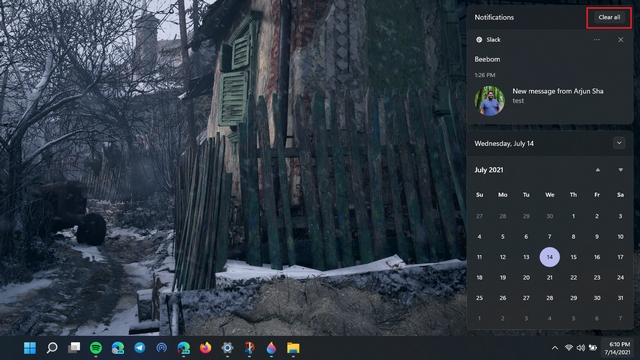
One final tip before wrapping up this article is the ability to dismiss notifications quickly with a click. Windows 11 brings a handy “Clear all” button to help users bulk dismiss unnecessary notifications. To do this, open the notification center by clicking on the date and time UI or using the new keyboard shortcut Windows + N. Once you are there, you will notice a new “Clear all” button at the top right. Click on it to dismiss all notifications in Windows 11.
Disable Distracting Notifications on your Windows 11 PC
If you are an avid Windows user, you might have noticed that the steps for disabling notifications in Windows 11 have not changed a lot as compared to Windows 10. Having said that, we hope this article helped users who are trying Windows 11 out for the first time or switched from Mac to a Windows PC due to all the cool new Windows 11 features. If you found this guide useful, check out our articles on taking screenshots in Windows 11 and checking the screen on time in Windows 11.
